Configure Multiple EBGP Sessions
Now that you know how to configure an EBGP session, let’s move on to a more realistic scenario: you have a site with a WAN edge router connected to two upstream ISPs, and you’re running EBGP with them.
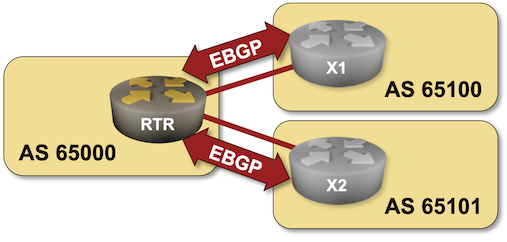
The routers in your lab use the following BGP AS numbers. Each upstream router advertises an IPv4 prefix and the default route.
| Node/ASN | Router ID | Advertised prefixes |
|---|---|---|
| AS65100 | ||
| x1 | 10.0.0.10 | 192.168.100.0/24 |
| AS65101 | ||
| x2 | 10.0.0.11 | 192.168.101.0/24 |
Device Requirements
- Use any device supported by the netlab BGP configuration module for customer and external routers.
- netlab can configure default route origination on almost all supported devices. You’ll have to configure BGP default route origination yourself if you want to use an unsupported device for X1 or X2.
- You can do automated lab validation when running Arista EOS or FRRouting on X1 and X2.
Start the Lab
You can start the lab on your own lab infrastructure or in GitHub Codespaces (more details):
- Change directory to
basic/2-multihomed - (Optional) enable the extra tools you want to use
- Execute netlab up
- Log into your device (RTR) with netlab connect rtr and verify that the IP addresses are configured on all its interfaces.
Configuration Tasks
- Start BGP routing process with AS number 65000
- Configure EBGP sessions using the following parameters:
| Node | Neighbor | Neighbor IPv4 | Neighbor AS |
|---|---|---|---|
| rtr | x1 | 10.1.0.2 | 65100 |
| rtr | x2 | 10.1.0.6 | 65101 |
Tip
- If you’re using FRRouting on RTR, you might have to enable the BGP daemon first. You’ll find more details in the Configuring FRRouting lab.
- Not sure how to configure BGP on your device? You’ll find pointers to the relevant vendor documentation in the Further Reading section.
Warning
If your device happens to be fully compliant with RFC 8212 (example: Cisco IOS XR), you’ll have to configure a permit everything incoming filter on all EBGP neighbors or your device won’t accept anything they send you.
You can also configure neighbor description and BGP neighbor status logging to get an information message when the BGP session is established.
Verification
You can use the netlab validate command if you use FRRouting or Arista EOS on the external routers.

If that command fails or you’re using another network operating system on the external routers, it’s time to start a troubleshooting session.
Check the state of the BGP session with a command similar to show ip bgp summary. This is a printout taken from Arista EOS:
rtr#show ip bgp summary
BGP summary information for VRF default
Router identifier 10.0.0.1, local AS number 65000
Neighbor Status Codes: m - Under maintenance
  Neighbor V AS           MsgRcvd   MsgSent  InQ OutQ  Up/Down State   PfxRcd PfxAcc
  10.1.0.2 4 65100              9         8    0    0 00:00:10 Estab   2      2
  10.1.0.6 4 65101              7         6    0    0 00:00:06 Estab   2      2
Finally, use a command similar to show ip bgp to verify that your router received three prefixes from each EBGP neighbor: the IPv4 prefix configured on the remote loopback interface, another IPv4 prefix, and the default route. This is what the printout looks like on Arista EOS:
rtr#show ip bgp
BGP routing table information for VRF default
Router identifier 10.0.0.1, local AS number 65000
Route status codes: s - suppressed contributor, * - valid, > - active, E - ECMP head, e - ECMP
                    S - Stale, c - Contributing to ECMP, b - backup, L - labeled-unicast
                    % - Pending BGP convergence
Origin codes: i - IGP, e - EGP, ? - incomplete
RPKI Origin Validation codes: V - valid, I - invalid, U - unknown
AS Path Attributes: Or-ID - Originator ID, C-LST - Cluster List, LL Nexthop - Link Local Nexthop

          Network                Next Hop              Metric  AIGP       LocPref Weight  Path
 * >      0.0.0.0/0              10.1.0.2              0       -          100     0       65100 i
 *        0.0.0.0/0              10.1.0.6              0       -          100     0       65101 i
 * >      192.168.100.0/24       10.1.0.2              0       -          100     0       65100 i
 * >      192.168.101.0/24       10.1.0.6              0       -          100     0       65101 i
Next:
- Advertise your IPv4 address space to the EBGP neighbors
- Use multiple BGP AS numbers on the same router (advanced exercise)
Further Reading
You’ll use the same configuration commands as in the previous lab exercise, just with an extra BGP neighbor. You’ll find pointers to the vendor documentation describing how to start a BGP routing process, configure EBGP neighbors, and deal with the default EBGP policy (FRRouting and Cisco IOS XR) in its Further Reading section.
You might also find these blog posts useful:
- BGP Routing Tutorial Series: Part 2 explains the difference between single-homed and multihomed networks and why multihomed networks run BGP with their upstream providers.
- BGP Routing Tutorial Series: Part 4 describes what a multihomed site gains by running BGP with its upstream ISPs and how BGP uses the AS path length to choose between routes received from them.
Reference Information
This lab uses a subset of the 4-router lab topology. The following information might help you if you plan to build custom lab infrastructure:
Lab Wiring
| Origin Device | Origin Port | Destination Device | Destination Port |
|---|---|---|---|
| rtr | Ethernet1 | x1 | eth1 |
| rtr | Ethernet2 | x2 | eth1 |
Lab Addressing
| Node/Interface | IPv4 Address | IPv6 Address | Description |
|---|---|---|---|
| rtr | 10.0.0.1/32 | Loopback | |
| Ethernet1 | 10.1.0.1/30 | rtr -> x1 | |
| Ethernet2 | 10.1.0.5/30 | rtr -> x2 | |
| x1 | 192.168.100.1/24 | Loopback | |
| eth1 | 10.1.0.2/30 | x1 -> rtr | |
| x2 | 192.168.101.1/24 | Loopback | |
| eth1 | 10.1.0.6/30 | x2 -> rtr |